Thursday, November 29, 2012

Sour Cream Raisin Pie

As all the leftovers are finally gone and the last morsel of pie is GONE, I sat back to think about Thanksgiving this year. My Mother had caught a cold, and we postponed are celebration to Friday. It turned out great. My Husband and I were able to do something we have never done before on Thanksgiving day, we went for a motorcycle ride. It was 60 degrees out and some sun.


Sporting some pretty motorcycle hair........

On Friday, the weather had changed and reality was back. We were able to all be at my Mom's house. She was feeling much better. No one had anywhere they needed to go that day, so we enjoyed the afternoon together. My Mom made the Turkey, stuffing and both potatoes. My sisters and I made all the sides and desserts. It was delicious feast and the placemats looked great.


One of our Thanksgiving traditions is Sour Cream Raisin Pie. In our family, a Thanksgiving without Raisin Pie would make the holiday incomplete. Most people probably have never had Raisin Pie and they are missing out. If you love Raisins, you would love Raisin Pie.

The Raisin Pie recipe comes out of the Hope Reformed Church cookbook. 100 year edition. I have had this cookbook since 1992.  Hope Reformed Church is in George, Iowa. Both of my Gandparents are buried in the cemetary next to the church. George Iowa is a blip on the map and a long ways from home.

Raisin Pie is a quick recipe. (have we heard this before) It makes an eight inch pie. It is not a huge pie so it is perfect for that once a year indulgence. This pie SHOULD have meringue. It would look finished, but I have not mastered meringue yet. Mine is always flat and lackluster. The recipe calls for three egg whites whipped up and gently placed on the pie and put under the broiler for a minute until lightly brown. Watch closely.


Sour Cream Raisin Pie
adapted from 2 recipes in the Hope Reformed Church Cookbook

Ingredients

1 baked pie crust
2 cups raisins
1 1/2 cups of warm water
1 cup of granulated sugar
3 eggs beaten
3/4 cup of milk
3 tablespoons flour
1 cup of sour cream or plain yogurt
1 teaspoon cinnamon
1 pinch of nutmeg

Directions

Bake pie crust to directions and let cool. Or make your own.

Submerge raisins in warm water and let soak for 10 minutes or so. Set aside

In a saucepan over medium heat, add sugar and beaten eggs. Mix together. Add milk and combine.
Stir in flour. Continue to stir until it thickens.
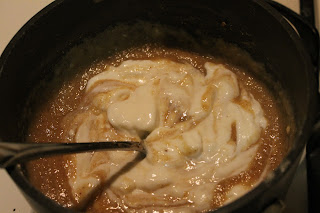
Remove from heat, add sour cream, cinnamon and nutmeg. Mix together.
Drain raisins. Add raisins to the custard mixture
Pour into cooled pie crust. Smooth out and let set up. DONE!


soaking raisins in two cup measuring container


Sour cream added to the custard mixture to thicken


Adding raisins and mixing together


Poured into a cooled slightly over-cooked crust and smoothed out


Rich, Earthy and Very Delicious. A compliment to a Thanksgiving Feast.


Tuesday, November 20, 2012

Burlap Placemats

Happy Thanksgiving. I decided this year we need to jazz up our Thanksgiving table, so onto the Internet I surfed. I found these wonderful placemats on Pinterest.com. My Mother ask me why we needed placemats, if there was a tablecloth. I really did not have an anwser for her other then "they are cool." I am always up for an Arts and Craft project. I really should have gone to Art School. Maybe in another life.


This project took me a bit longer than I anticipated. Which is always true with any project. 
This would also be a great project to do with your kids. Everyone is Thankful for something different. This project leaves room for interpretation. You could always do a table runner if the was more suitable for you. It is crazy notion that cutting fabric, pulling threads stencilling and painting fabric would make for
a wonderful Sunday afternoon.

Cutting the fabric
 By establishing straight lines in the beginning, you will make this such an easier project. There is very little cutting. Burlap seems to work better when you are pulling threads.You maintained straight lines by pulling the threads out.
You could fray around your mat as much as you want.
Inserting the ribbon after pulling out threads
I found this Fall Ribbon at the Dollar Store. The ribbon had wire on the edges, so once it was in place,
it held its own. When it was wove through the burlap, it just needed to be flattened down. 
I really like the touch it added to the placemat.

My helper Apple Jax.
 She was incharge of the ribbon playing and flattening out the placemats


Stencilling the words and then painting in the letters. Each placemat said a different word.
You could free hand your letters. I had old fashioned block stencils that worked perfectly.
According to the original post on Pinterest, they used a Sharpie to color in the letters.


These placemats will be perfect for Thanksgiving.


Friday, November 16, 2012

Cranberry Apple Oatmeal Cookies

Last night, I was working on my second bakery order for my friend Ursula. She wanted a loaf of the Banana Nutella Bread to take to friends for Thanksgiving. When you make the Nutella Banana bread, please make sure you swirl the Nutella with the Banana Bread dough. My first loaf had a big glob of filling in the middle of it. I had a bad feeling when I took it out of the oven. It tasted great, looked great but cut horrible. So I decided at eight o'clock at night to make a second loaf. It turned out perfect. But in between my two bread loaves, I made these lovely Cranberry Apple Oatmeal Cookies. If you like Oatmeal Raisin cookies, then you should like these. A soft cookie packed with flavors in every bite.


The fresh cranberries, so tart, the fresh apples, just sweet enough and oatmeal. Hearty and Delicious.


This recipe makes a small batch of cookies. I made 28 small size cookies. The recipe stated that it would make 24 cookies. Perfect for quick cookie fix or company during this time of year or breakfast on the go.

Cranberry Apple Oatmeal Cookies
Slightly adapted from jellytoastblog.com

Ingredients

1/2 cup (1stick) butter
2/3 cup brown sugar
1 egg
1 teaspoon vanilla extract
3/4 cup whole wheat flour
1/2 teaspoon baking soda
1 teaspoon cinnamon
1/2 teaspoon salt
1 1/2 cup of Oatmeal
1/2 cup chopped fresh cranberries
1/2 cup finely chopped fresh apples
zest of 1 orange

Directions

Preheat oven to 350 degrees. Line baking sheets with Silpat or Parchment Paper. Set aside

In a medium bowl, whisk together flour, baking soda, salt and cinnamon. Set aside

In a bowl of a stand mixer, cream together butter and sugar until light and fluffy. Add egg, mix. Add vanilla and orange zest and mix until incorporated.

With the mixer on low, gently add flour mixture to the butter mixture. Mix until just incorporated. Add oats and gently mix. Fold in chopped fruit with a spatula. Do not over mix.

Scoop dough with cookie scoop and place on lined baking sheets. Bake for 10 minutes or until edges "JUST" start to turn brown. Allow to cool on the sheets for five minutes. Transfer to a wire rack to cool completely. Cover and store at room temperature.


The mixing bowl is filled with fruit. I was worried that the cookies would spread, but they did not.


Can you see all the fruit. I am really glad I found this recipe.  
Yummy ~~ and as always, Husband approved

Wednesday, November 14, 2012

Apple Walnut Bread

Last night I was so ambitious. For dinner we had Meatloaf and Scallopped Potatoes. The meatloaf was delicious. The dinner remainded me of my childhood. My Mom would make meatloaf and creamy potatoes regularly. It filled us up and we loved it. I took a picture with my cell phone. I posted it on Facebook. I made a large pan of Meatloaf. Not really sure who will be eating all of this since we are only three people at my house again. Lots of left overs. Great for lunch.


 There is no presentation here. Not plated all pretty with the potatoes on the side and a garnish. Just Dinner

So for dessert, since we were not full enough from this huge dinner, I made an Apple Walnut Bread. This bread is so moist and not overly sweet. You get to enjoy the earthiness of the Apples and Walnuts. I found this recipe two years ago, and have made it several times. I made this bread for the fundraiser I worked at a few weeks ago. It makes one nice size loaf or four mini loaves. Perfect for gift giving.


ALSO, If you have a jar of Apple Butter in the back of the frig, pull it out. Apple Butter throws this bread over the TOP. And sadly my Apple Butter is now gone. 

Apple Walnut Bread
adapted from sparklingink.com

Ingredients
1 cup all purpose flour
1 cup whole wheat flour
2 teaspoons baking powder
1 teaspoon baking soda
1 teaspoon ground cinnamon
1/2 teaspoon nutmeg
1/2 teaspoon salt
2/3 cup plain yogurt
1/2 cup brown sugar
4 ounces (1/2 stick) melted butter
1/3 dark Karo syrup
2 eggs
1 teaspoon vanilla extract
2-3 apples (1 1/2 cup grated or finely chopped)
3/4 cup chopped walnuts

TOPPING
Brown sugar
Cinnamon

Directions
Preheat oven to 350 degrees. Grease a 9 x 5 loaf pan and set aside.
Peel and finely chop or grate apples.
Combine flour, whole wheat flour, baking powder, baking soda, cinnamon, nutmeg and salt in a bowl. 
In a large bowl of a stand mixer, add yogurt, brown sugar, melted butter, syrup and mix. Add eggs one at a time and mix. Add vanilla and mix.
Gently mix in dry ingredients until just combined.
Add in Apples and Walnuts and mix until combined.
Scoop batter into loaf pan. Top with Cinnamon and sprinkle some brown sugar.
Bake for 40-50 minutes or until toothpick comes out clean. Let cool in pan. Invert and place on a plate.


a hearty batter mixed with the Apples and Walnuts


 The Cinnamon and Brown Sugar add a nice sweet topping


I really wish I had taken a picture with the Apple Butter, but it really tasted great plain.

Furthermore, I am usually not this ambitious at all. Just a Fluke.

Monday, November 12, 2012

Marble Coffee Cake

I had a wonderful weekend. There were no parties, no catering, no where to go, nothing. Just Sunday Funday.... Different from other Sundays. It was also a NO Makeup Sunday!! And I got to stay home all day. It was truly a wonderful day. Some people may say this is 'boring" or "lame", but I enjoyed my self. I was also able to partake in an old family tradition, I took a nap. You have got to love life once in a while. Granted, I still did laundry and cleaned the house and those things do not change. My Husband also threw out his back on Saturday, so I was also a nurse, but somewhere along the line, I really enjoyed my day.


I can across this recipe, sitting in the Dentist's office last Thursday. Terrible tooth ache. I believe I cracked a filling. The Dentist was hinting at a Root Canal and Crown, but through some pleading (by ME) she inserted a medicated filling. I have to go back next week for the real silver filling. I really did not want to provide her with a Thanksgiving bonus.

Marble Coffee Cake. This recipe just sounded wonderful. I really like cake. Almost any cake. Just really good cake. The filling is a combination of Mini Chocolate Chips, Brown Sugar and Cinnamon. Such a wonderful combination of flavors. A simple glaze on top to seal in all of these delicious tastes.

Marble Coffee Cake
slightly adapted by insidebrucrewlife.com

Ingredients
For the Cake
3/4 cup softened butter
1 cup granulated sugar
2 eggs
1 cup plain yogurt or sour cream
1 teaspoon vanilla
2 cups flour
2 teaspoons baking powder
1 teaspoon baking soda
1/2 teaspoon salt

For the Filling
1 cup brown sugar
1 cup mini chocolate chips
2 tablespoons ground cinnamon

For the Glaze
1/2 cup powdered sugar
2 teaspoons water

Instructions
Preheat over to 350 degrees. Spray or butter a regular size bundt pan. Set aside
Sift together flour, baking powder, baking soda, and salt in a medium bowl and set aside.
Cream the butter and sugar together until light and fluffy. Beat in eggs one at a time. Add yogurt and vanilla. 
Slowly add dry ingredients to the butter mixture. Mix until all just incorporated.

Mix together filling ingredients. Spread half of the batter into your bundt pan. Sprinkle in one cup of the filling mix. Spread the rest of the batter into the bundt pan. Sprinkle with the rest of the filling mixture. Bake for 45-50 minutes. Test with a toothpick. Let cool in pan for 10-20 minutes. Invert onto a cake plate and cool.

Mix together the powdered sugar and water. Drizzle over the top of the cake. Let sit before slicing.


Spooning the filling onto the batter


I had debated about adding the glaze. I am glad I did. The glaze gave the cake such a nice color.

As I enjoyed my tea and ate my cake ~~ I was remained that Life is good, even on a Sunday in November.

P.S.
I brought a plate of cake to work today, my coworkers goobled it up. Coffee cake and coffee are a great way to start a work week.


Wednesday, November 7, 2012

Pumpkin Blondies

On Saturday, my friend Mary and I celebrated her birthday. We had a lovely leisurely lunch and did some local shopping. It was nice shopping local. It is not something we do enough of.

I made her a batch of these lovely blondies. I had found the recipe on Thursday and made them on Saturday. They are super moist and flavorful. Just an explosion of flavors in your mouth. These bars would be great for a party or outing. They are a tall bar in a 9 x 13 pan. They cut very nicely also.


I pulled out this baking dish for the photo. My Mother gave it to me for Christmas last year. Never been used. I really need an idea of something to bake in it.

Pumpkin Blondies
adapted from browneyedbaker.com

Ingredients

2 1/2 cups of all purpose flour
2 1/2 teaspoons ground cinnamon
3/4 teaspoon ground ginger
1/2 teaspoon ground allspice
1/2 teaspoon ground nutmeg
1 teaspoon baking soda
1/2 teaspoon salt
1 cup butter (2 sticks) melted and cooled
1 cup brown sugar
1/2 cup granulated sugar
1 egg
1 tablespoon vanilla extract
1 (15ounce) can pure pumpkin puree
1 cup butterscotch chips
1 cup white chocolate chips
1 cup pecans, coarsely chopped

Directions

Preheat oven to 350 degrees. Grease a 9 x 13 baking pan.

In a medium bowl, whisk together the flour, cinnamon, ginger, allspice, nutmeg, baking soda and salt. Set aside.

In a large bowl of a stand mixer, add melted butter and both sugars. Mix until completely smooth. Add egg and vanilla and mix until incorporated. Add pumpkin and mix thoroughly. Add the flour mixture and mix until just blended. Fold in butterscotch and white chocolate chips and pecans. Pour batter into prepared pan and smooth into an even layer.

Bake for 35 to 45 minutes. Until knife comes out clean. Set pan on wire rack to cool completely. Cut bars and start eating. Bars can be stored in an airtight container for up to 5 days. IF they last that long.


It is a full bowl of batter. This is a very satisfying little dessert.


They are also husband approved and Mary wants the recipe.

Tuesday, November 6, 2012

Fudgey Nutella Cookies

Again, going out on a limb. These are the EASIEST cookies I have EVER made. Once in awhile, I hear, "I am just not a baker." Anyone can make these. FIVE ingredients. That is all. This is not a huge recipe. I made 25 nice size cookies. Might ever get 26, if you do not taste test the dough.

This recipe is easy and great. Fabulous home made cookies. We also decided that they would be Perfect as a Ice Cream Sandwich.


Wow, One cookie. I forgot to take the picture before we went to my Sister's house for dinner. Lone Ranger

Fudgey Nutella Cookies

Ingredients

1 13oz container of Nutella (small size)
4 tablespoons of brown sugar
2 eggs
1 1/4 cup of flour
1 teaspoon sea salt

Preheat oven to 350 degrees. Line baking sheet with Silpat or Parchment Paper

Combine all ingredients in a large bowl of a stand mixer. Mix until all ingredients are well combined. Place dough in freezer for 10 minutes.

After 10 minutes, scoop dough into approximately one inch balls. Bake for 8-10 minutes. Remove from oven and let cool in pan until cookies are set. Carefully transfer to a wire rack.


Letting them sit in the freezer, let the soft ingredients firm up slightly


They were such a perfect cookie. Slightly crunching on the outside and moist and delicous on the inside.


Lone Ranger ~ Last Cookie Left

Monday, November 5, 2012

Pop/Corn Puff Caramel Corn

What have I found. A hugely addicting snack. I could literally eat the whole pan. I really should not even make it. My whole family could eat it all. I bought a huge container of it to my sisters yesterday, and at the end of the night, there were only a few scraps left. I made a sandwich baggie for my Mom. Happy Birthday. We ate your treat. It was so freaking good.


Popcorn, Corn Puffs and some Peanuts ~ Wow Shayla ~ you are going out on a limb. This is amazing. AND Easy. It melts in your mouth. No wonder why I need to go to the Dentist. Sweet ~ Salty ~ Crunchy. Pure Heaven. The first time I had this, I was at a 40th birthday party for one of my neighbor ladies. Another neighbor lady made this. Pure delicious. So the next day, after the bottle of wine wore off, I was on Foodgawker.com. I needed to find the recipe for my new addiction.

Most recipes out there, just use the corn puffs. I of course had to modify the recipe. Make it better.

Add some pop corn, a cup of roasted peanuts, and you can go from there.

Pop-Corn Puff Caramel Corn

Ingredients

1 3 1/2 ounce bag of corn puffs
1 microwave bag of pop corn - popped
1 cup dry roasted peanuts (optional)
1/2 cup butter (1 stick)
1 cup brown sugar
1/2 cup light corn syrup
1 teaspoon baking soda

Directions

Preheat oven to 250 degrees.
Line a large roasting pan or cookie sheet with tin foil. (you will be happy you did when you clean up.)
Place corn puffs, popcorn and peanuts in the large pan.
In a medium sauce pan, cook together butter, brown sugar, corn syrup for two full minutes, stirring constantly.
Add baking soda to the mixture. Mix thoroughly
This will cause the mixture to foam.
Pour caramel mixture over the puffs/popcorn/nut mixture. Continue mixing
Place pan in oven for 45 minutes.
Remove from oven ever 15 minutes and stir thoroughly. Place back in oven.
Once your 45 minutes is over, remove pan from oven and let cool.

Break up and eat.


This is why you need a large enough pan. The baking soda causes the sauce for foam up and change color


As you continue to stir and bake, all the corn gets covered in the syrup. Salty and Sweet all in one.

Can you taste it melting in your mouth??