Monday, November 25, 2013

Pumpkin Swirl Bread

I was looking for recipes yesterday instead of working on my Christmas Cards. Bored. I found several recipes for better dinners. Wow, I have been making the same crap (food) over and over. I had a last ditch for Fall for some orders for Thanksgiving. Then pumpkin is gone and bring on Christmas.

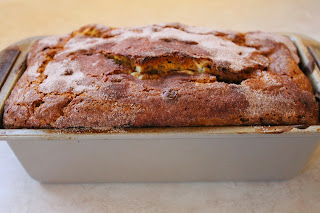
I forgot how beautiful and delicious this bread is and I do not like pumpkin. I am sending to my Florida sister. I miss her and she is very busy these days. Sending love from home. Not a mediocre, this is a show piece. I used my large loaf pan, and it was full. You could possibly make two small pans (8x4) and not fill all the way and still have something to give.

Pumpkin Swirl Bread
adapted from Blogs.babble.com
Ingredients

5 tablespoons softened butter
1 cup brown sugar
1/2 cup granulated sugar
3 large eggs
1 15 oz can of pumpkin
1/4 cup of milk
2 3/4 cups of flour
2 teaspoons of baking powder
2 tablespoons of pumpkin pie spice
8 oz of cream cheese
1 egg
1/3 cup sugar

Topping- 1/4 cup granulated sugar and 1 teaspoon cinnamon. MIXED (optional)

Directions

Preheat oven to 350 degrees. Spray with baking spray or butter 1 large 9 x 5 loaf pan. Set aside

In a mixing bowl with a paddle attachment, beat together butter, brown sugar and 1/2 cup of granulated sugar until fluffy. Add in eggs, one at a time, add in pumpkin and milk and mix. Add dry ingredients at once and mix through.

In a second mixing bowl, beat together the cream cheese, egg and 1/3 cup of sugar. Set aside.

In your large loaf pan, Pour in a thin layer of the pumpkin batter into the bottom of the pan. Spoon half of the cream cheese filling over the pumpkin. Spoon almost all the the pumpkin batter of the cream cheese filling. Spoon the rest of the cream cheese over the pumpkin. Cover with the remaining pumpkin batter and ever so slightly swirl the top only. DO not dive into the batter. Sprinkle with the Cinnamon-Sugar topping.
Bake for 60-70 minutes or until toothpick comes out clean.

Let cool for at least a 1/2 hour. Invert and place on plate.


Just some basic ingredients


Ugly good kind of batter


That is one large loaf of Pumpkin Bread


LOOK at all of that moistness.  Yummy delicious
ALSO -- my Christmas cards are getting SO close to being done..


Thursday, November 21, 2013

JOY Sign

I looked at the calendar, and had several freak outs. Where have I been???? The month is more than half over, and I have not written all month. Sorry folks... I have been baking up a storm. Sweets by Shayla, has been very busy. I am so appreciative of all the business lately, BUT my creativity has gone into cakes. I really do like designing cakes and doing something different on each cake.

My other freak outs are that my Christmas cards are not started. I finally have the paper and cards. I am using a stamp from over 10 years ago. I wanted to see what I would do differently. These cards will not be going out early this year. No way, NO how...

Another freak out, last year I made this beautiful outdoor garland. It turned out great. (Featured last December) I was given a huge amount of garland and greenery last January. I bought all the stuff  to fill it at over 75% off. Bargains galore. BUT, I never started the garland. Looked at it, thought about it, BUT never did it. OMG....

My last freak out, I wanted to make this JOY sign. I have been begging for pallet boards. I have been informed that pallets are VERY hard to take apart. They never say that on Pinterest. So my husband found some old boards and off I went.


I liked this sign, but I did not want to shaggy bottom. 

This sign was a two day project. Could be done in a day, but I never start anything early. 


Just a few pieces to start this project


Power tools. Love them. Lined up the four boards, put a backer board on the backside 
and screw them in to support the board. 
I put a backer board near the top and bottom on the backside.
If you do not have a screw gun, a hammer and nails will also work.


In a former life, I was a tagger. I love spray painting.
I went over the boards a few times, to fill in.
Then I used Gold spray paint to form whispy lines for accents
  

I laid down the stencils. You could space them anyway you want. 


Started painting with the Gold. I needed to go over it twice. 
The boards just sucked up the paint. 
I removed the stencils and filled in. 


I did not like the Gold. You would never see it from the road.
I used a dark Green over the Gold, once that was dry, I went over 
the dark Green with a Metallic Green. 
Altered the letters a bit, added slight serifs. 
This project is open to interpretation. DO WHAT YOU WANT


Finished Project.... YEAH!! One done.
Someone asked me how my Christmas shopping was going... YEAH Right....
That is another Freak out.